Hey fellow space enthusiasts! 👋🌌 Remember those early days of the internet when creating a website was like exploring the uncharted cosmos? 🌠 Well, I’ve got some exciting news that will take you on a journey back in time with me! 🕰️✨
After a cosmic leap of 15 years, I am thrilled to announce that I’ve decided to breathe life (for some time) into a long-forgotten project – my beloved static website dedicated to space science and astronomy! 🚀🌟
As a software lead with a passion for web application development, it’s incredible to think that these few webpages were my very first college-like endeavor into the vast realm of online exploration. 🎓🌌 Back in 2008, armed with a simple webpage designer tool and boundless curiosity, I launched it on an ancient free webpage hosting site that seems to have vanished into a black hole since then! 😅
But you know what? The nostalgia is real! And that’s precisely why I’ve decided to make it live again – a digital time capsule, a portal that transports us to those golden days of coding and discovery! 🚀🌌
#BeyondTheSky – that’s what I called it back then, and that’s what it shall be now! 🌠✨ Join me as we relive the awe-inspiring wonder of space science, wrapped in a veil of curiosity and dipped in the colors of fond memories. 🌈💫
I can’t wait to share the revamped website with you all, where we’ll explore celestial wonders, stellar mysteries, and pay tribute to our unending fascination with the cosmos. 🪐🌌
So, stay tuned for the (mini and probably an ephemeral) launch! Let’s embark on this cosmic adventure together and keep the spirit of exploration alive, now and forever (before it gets vanished in some time capsule again)! 🚀🔭💫
If you are a developer of web applications, its not possible that you haven’t heard about the Angular framework. While this post is being written, its 7.2.4 version has been published which was first published (Angular 2) in September 2016. If you have worked or even played with it, you must have noticed that it’s simply amazing that all the necessary bits and pieces – building blocks – are clubbed into a single framework – which makes it very developer friendly.
To fully utilise and envisage the features of Angular, there are few things we must consider while designing the UI project. If developers of your project have not structured and designed the code base properly, your team won’t be able to reap the benefits of using this great framework. Moreover, you’ll see some of the symptoms near to the end of your release cycle if you don’t observe them properly – which will make it even more challenging to be fixed.
I have kept some points apart so that others can consider it while starting with their Angular project.
Utilise lazy loaded modules and routing
Let your UX team know how you can add value to your product
Create separate chunk for 3rd party npm packages
Don’t use hard coded values – instead encrypt them from server and decrypt at client. i.e. license keys
Use nrwl workspace while working with multiple UI applications
Never access DOM elements the jQuery way
Keep checking the performance with Augury
Unsubscribe on ngDestory or whenever you are done with the observable
Communities for node programming and npm packages are increasing exponentially day by day. While using the npm packages, many times we need to check what is the latest version on the repository and installed version of a package locally, what are their dependencies, license, etc. Everytime we have to google for the command since they are kinda similar and we don’t remember.
After having such experiences frequently, I thought of creating a post for the commands I need to use mostly so that I can find everything in just one page. Here they all are.
Show specified package’s version in the registry
> npm view @angular/material version
6.4.1
Show all the published versions of a package (include pre-releases)
Show all the installed packages with their dependencies’ tree
use -g to see the globally installed packages. For locally installed packages, just say npm list
> npm install <package-name>@latest
> npm i @angular/material@latest
Install a specific version of a package
> npm i @angular/material@6.4.1
Also, while creating a new npm package for an Angular library project with nrwl, everytime we need to run the commands to build the project and to create .tgz file for it. You can create a script inside your package.json file. Let’s go step by step.
Create an entry inside your script section in your package.json to build your project and to generate dist.
“step1_build”: “ng build –project=<project-name>”
Create another entry to create .tgz file for the dist generated, to upload to npm repository (needs ng-packagr)
“step2_pack”: “cd dist/folder-name && npm pack”
Now create the last entry to call the above two commands.
“package”: “npm run step1_build && npm run step2_pack”
Now, whenever you are ready to build another version of the same lib, just run npm run package command from the prompt and your package will be ready!
What are the other commands you need to use most often and you need to google every time? Do provide them in the comments section below, will surely include them in this list!
In my previous posts, I’ve talked about unit testing AngularJS controllers. The idea was just to unit test the code we have already written. But that’s not the ideal way we should write new functional code, isn’t it?
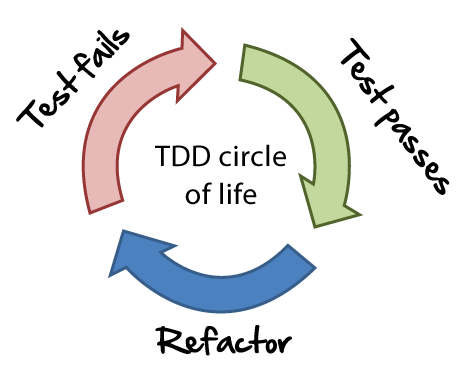
It should be other way round. Ideally, the development of the code/component should be test driven. What does that really mean is, ideally, we should start writing the unit test case first, let the test fail, write the code as per test case’s expectations and then let the test pass.
There is much content available online for the people who know AngularJS and want to learn Angular 2+. However, not quite good posts are available to learn TDD approach for this technology. This post talk about how to do so. Keep in mind that there is a slight paradigm shift needed for TDD so its okay if you think you are not able to digest the steps at the very first attempt, after 2 – 3 try, I’m sure you are going to start liking this. So let’s jump in! 🙂
Below are the steps to follow while doing TDD (reference: wikipedia)
Add a test
Run all tests and see if the new test fails
Write the code
Run tests
Refactor code
We are going to follow the same for Angular using amazing command line utilities provided by @angular/cli.
We are going to develop an angular 5 component which does addition/subtraction/multiplication. We will be having two properties for two operands and three methods to perform the operations respectively. For each operation, we will go through three basic different scenarios which fits most of the day to day code we write.
Prerequisites: You must be having below tools installed on your machine.
NodeJS
npm
@angular/cli: version 1.7
VSCode (not mandatory, but the best if you use this)
Basic understanding of Unit Testing in Angular with Jasmine would help.
So what are we waiting for? Let’s start!!!
Create new Angular application to begin. From your command prompt, type below command for that.
ng new ng5-tdd
This command will take awhile and create the basic application structure for you. Once this is done, open it using VSCode and start VSCode command prompt with Ctrl+`.
Create a new component as per below code snippet.
D:\ng5-tdd>ng g c calculator
                           //g - generate, c - component
 create src/app/calculator/calculator.component.html (29 bytes)
 create src/app/calculator/calculator.component.spec.ts (656 bytes)
 create src/app/calculator/calculator.component.ts (285 bytes)
 create src/app/calculator/calculator.component.css (0 bytes)
 update src/app/app.module.ts (414 bytes)
Many files has got created. Now open calculator.component.spec.ts. Keep in mind that we are doing TDD here! 🙂
Now, let’s add below test case in this file.
This file contains bidirectional Unicode text that may be interpreted or compiled differently than what appears below. To review, open the file in an editor that reveals hidden Unicode characters. Learn more about bidirectional Unicode characters
After pasting the code your editor should have started screaming by now. 🙂 Yeah. It must. As we haven’t added the code yet. So go ahead and copy-paste-save below code in your calculator.component.ts.
This file contains bidirectional Unicode text that may be interpreted or compiled differently than what appears below. To review, open the file in an editor that reveals hidden Unicode characters. Learn more about bidirectional Unicode characters
Here, as you see, we have added the necessary properties and method for the addition operation. This was just a simple scenario – straight forward. In real life, the story is not that simple, isn’t it?
Usually, such functionalities (in our case, business logic) is either stays in Services, or it stays at sever.
So let’s go ahead and create a service to do some action.
D:\ng5-tdd>ng g service calculator/math
 create src/app/calculator/math.service.spec.ts (362 bytes)
 create src/app/calculator/math.service.ts (110 bytes)
This file contains bidirectional Unicode text that may be interpreted or compiled differently than what appears below. To review, open the file in an editor that reveals hidden Unicode characters. Learn more about bidirectional Unicode characters
Again, you must be getting errors, so go ahead and update the component code to make this test pass.
This file contains bidirectional Unicode text that may be interpreted or compiled differently than what appears below. To review, open the file in an editor that reveals hidden Unicode characters. Learn more about bidirectional Unicode characters
Here we have injected MathService as a dependency. You should have noticed that in the test case, 5 * 7 doesn’t equal to 500. But still we made the test pass. Why? The reason is, the component is simply assigning the return value to the result property. So in the test, we just need to make sure that the value returned by the service is getting assigned at the appropriate place. That’s it!
Now many times service gives asynchronous result. We are going to test that scenario next. Make changes as per below files suggest.
This file contains bidirectional Unicode text that may be interpreted or compiled differently than what appears below. To review, open the file in an editor that reveals hidden Unicode characters. Learn more about bidirectional Unicode characters
This file contains bidirectional Unicode text that may be interpreted or compiled differently than what appears below. To review, open the file in an editor that reveals hidden Unicode characters. Learn more about bidirectional Unicode characters
This file contains bidirectional Unicode text that may be interpreted or compiled differently than what appears below. To review, open the file in an editor that reveals hidden Unicode characters. Learn more about bidirectional Unicode characters
So after updating the files, you’ll see that all of your tests pass and you have done async programming with TDD.
Conclusion
TDD is a slight paradigm shift to start with. However, you’ll be used to it once you start doing it. And in the agile software development, it is the ideal way a developer should do the implementation.
How do you like this post? Any thoughts, something you liked the most or anything you want to see improved? Feel free to share your thoughts in the comments below! I’ll be glad to know! See ya next time. Till then, happy TDDing 🙂
Hi there! Today I am going to talk about a very specific scenario we face while creating Angular service.
If you think you think you are aware of the initial information, and quickly want to jump to the main point with example, here is the link to the section.
So to start with, let’s say when you want to make an HTTP call from your Angular controller, you would do like this.
This file contains bidirectional Unicode text that may be interpreted or compiled differently than what appears below. To review, open the file in an editor that reveals hidden Unicode characters. Learn more about bidirectional Unicode characters
This file contains bidirectional Unicode text that may be interpreted or compiled differently than what appears below. To review, open the file in an editor that reveals hidden Unicode characters. Learn more about bidirectional Unicode characters
In this example, we are loading orders related data in orderController from ‘orderService’.
Now, these orders might be different to every user. We only what to show the orders to the users which belong to the him/her. At server we need to identify for which user the request is coming. We can anyways pass that info as part of the payload for the server to identify.
But that’s not how you should do, not the standard way! As the user related details is actually not for the call ‘loadOrders’, we should pass it in message header part, like example below.
This file contains bidirectional Unicode text that may be interpreted or compiled differently than what appears below. To review, open the file in an editor that reveals hidden Unicode characters. Learn more about bidirectional Unicode characters
Okay, got it, but this way we would end up putting the same code in each and every service function. Can we avoid this?
Yes, there is a better way.
We can create our own custom service, which does this additional work, and let our orderService work only for those things for which it is designed for. ‘Separation of Concerns’
This file contains bidirectional Unicode text that may be interpreted or compiled differently than what appears below. To review, open the file in an editor that reveals hidden Unicode characters. Learn more about bidirectional Unicode characters
This file contains bidirectional Unicode text that may be interpreted or compiled differently than what appears below. To review, open the file in an editor that reveals hidden Unicode characters. Learn more about bidirectional Unicode characters
This file contains bidirectional Unicode text that may be interpreted or compiled differently than what appears below. To review, open the file in an editor that reveals hidden Unicode characters. Learn more about bidirectional Unicode characters
Here, myHTTPSvc calls myAuthSvc to fetch logged-in user details, these details are used by myHTTPSvc to push those details inside headers. orderService is just calling myHTTPSvc and get its things done.
Have you observed $q.defer part? In myHTTPSvc.get function, we are dealing with an Async (the actual get) calls which is dependent another one (myAuthSvc.getLoggedInUserDetails). That’s where deferred.resolve comes into picture. So when we receive the result we are expecting, doing deferred.resolve(data) calls the success callback from the controller. You can read more about $q service at AngularJS Documentation for $q
Let’s talk about the same kind of scenario for Angular 2+. How we’d do as we don’t have $q service in Angular 2+?
That’s where Rxjs/AsyncSubject comes into picture. Have a look at the example below. It’s pretty easy and self explanatory.
This file contains bidirectional Unicode text that may be interpreted or compiled differently than what appears below. To review, open the file in an editor that reveals hidden Unicode characters. Learn more about bidirectional Unicode characters
Still not happy? You want more simplicity in the implemented get method?
Here comes Rxjs.Observable.forkJoin and.map!
This file contains bidirectional Unicode text that may be interpreted or compiled differently than what appears below. To review, open the file in an editor that reveals hidden Unicode characters. Learn more about bidirectional Unicode characters
The advantage of using .flatMap operator is that when we subscribe to get function of myHttpSvc from our component code, that will be subscribed for the Observable which is being returned by this.http.get function.
So precise and simple, it’s it?
There are many operators to explore for Rxjs and they all are worth to know!
TIO is a family of online interpreters for an ever-growing list of practical and recreational programming languages.
To use TIO, simply go to the site, pick a programming language, and start typing. Once you click the run button, your code is sent to a TIO arena, executed in a sandboxed environment, and the results are sent back to your browser. You can share your code by generating a client-side permalink that encodes code and input directly in the URL.
TIO hosts 96 practical and 172 recreational programming languages, for a total of 268 languages.
TIO listens: languages and features are added by request all the time. If you have a request or want to report a bug, use any of the contact options in the contact options listed below.
The TIO web app is free of charge, ad-free, and doesn’t use tracking cookies or third-party analytic scripts.
The software that powers TIO is open source (MIT) and can be found on tryitonline.github.io.
JS Bin is a tool for experimenting with web languages. In particular HTML, CSS and JavaScript, but JS Bin also supports other languages too (like Markdown, Jade and Sass).
JS Bin is ultimately a code sharing site. Along with the code, the complete output of the code is also shared with other developers, colleagues and/or students. As you type into one of the editor “panels”, you and anyone watching your bin will see the output being generated in real-time in the output panel.
A tool for easy online testing and sharing of database problems and their solutions.
If you do not know SQL or basic database concepts, this site is not going to be very useful to you. However, if you are a database developer, there are a few different use-cases of SQL Fiddle intended for you:
You want help with a tricky query, and you’d like to post a question to a Q/A site like StackOverflow.
You want to compare and contrast SQL statements in different database back-ends.
You do not have a particular database platform readily available, but you would like to see what a given query would look like in that environment.
It has been developed by group .Net developers who are sick and tired of starting Visual Studio, creating new project and running it, just to test simple code or try out samples from other developers.
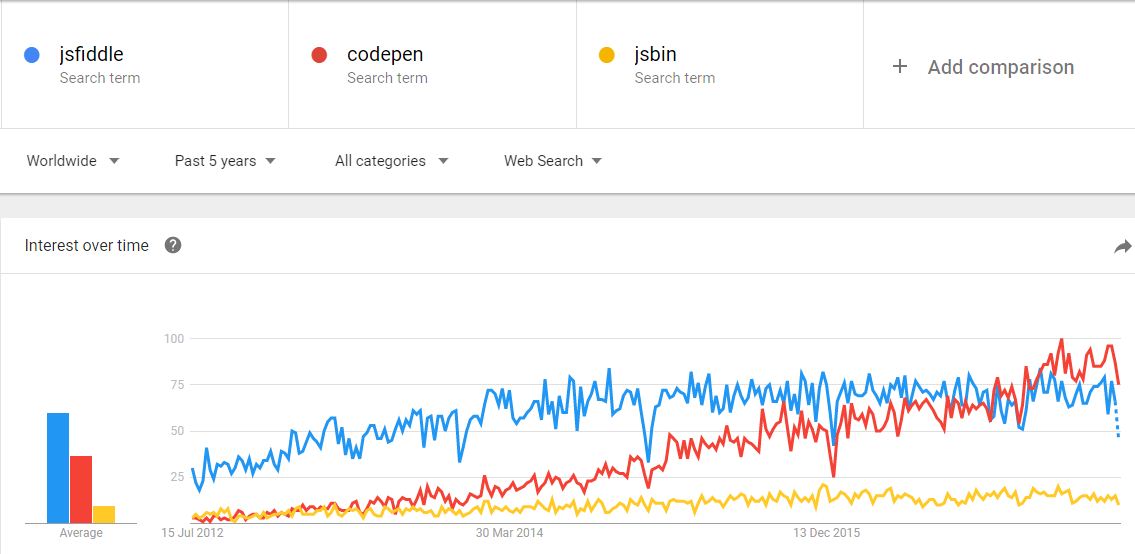
This tool was inspired by http://jsfiddle.net, which is just awesome.
Apart from the language and web technologies related tool, we also have some dedicated tools to create, test and share regular expression!
CodeBeautify is an online code beautifier which allows you to beautify your source code
Provides many utilities like JSON/XML/HTML/SQL formatter, validator, editor, minifier, etc…… and what not, just go there and explore!!! I have just told you the tip of the iceberg!
Credits for the details go to the amazing creators of the tool themselves!! – I am just a person sharing the lights of this awesome utilities.
Have you recently come across any such online tool not mentioned over here? Do mention in the comments below! 🙂
There are many ways your can simplify your regular day to day activities using windows/dos commands or shell scripts if you are using Linux. Here is the way you can start thinking about how you can do it!
Delete temporary files from your machine
Many times you want to delete the temporary files from your machine. So need to first of all go to the temporary files’ folder – ‘C:\Users\<UserName>\AppData\Local\Temp‘ (or just run –> %temp% –> enter; if you know it 🙂 ), select all files and then delete it.
Well, how about creating a batch script once, and just execute it whenever you want to do so, isn’t it a great idea?
Copy the below commands as a TempDelete.bat file, save it on your desktop (or wherever you you feel life saving it), and just double click on it whenever you want to clear your %temp% folder!
cd %temp%
del /s /q .
rmdir /s /q .
The first line opens up the DOS command prompt temporary files’ folder, the second command deletes all the files not in use currently and the third command removes all the child folders.
Just FYI, /q disables Yes/No prompting and /s optilon deletes the file(s) from all sub-directories.
Getting latest files from TFS version control system
If you are a developer, multiple people are working within your team and are doing code check-ins extensively, you must have to keep the local version of the code in sync with the version control system, right?
The people doing this regularly would be able to easily co-relate. If you are using Visual Studio, you need to reach to your project subfolder (and to reach at that folder too, you need to do multiple clicks, wait for folder to get updated with the child folders and files) and then right click, ‘get latest files’.
Well, there is a better way. Just create a batch file once, reach to the folder in the command prompt and get latest files using TF.exe command. When you are using Visaul Studio TFS GUI, the same commands are getting executed behind the scenes.
cd C:\path\to\mapped\folder\api
"<PathToIde>\TF.exe" get $/project/code/api/Main/ /recursive
cd C:\path\to\mapped\folder\web
"<PathToIde>\TF.exe" get $/project/code/web/Main/ /recursive
Copy the above commands and save it as a .bat file, update the <PathToIde>depending on the Visual Studio version you have installed and your OS.
For Windows 7-64 bit, Visual Studio version 10, its
%ProgramFiles(x86)%\Microsoft Visual Studio 10.0\Common7\IDE\TF.exe
Find out where TF.exe is located on your machine and update it.
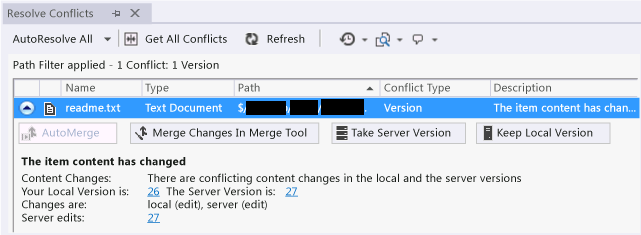
The good thing is, if you are having a conflict between the source control version and the local version, this command also provides you a GUI to solve it!
Isn’t this great?!
Now just call this batch file from your command prompt, and get the latest version of files from all the project in single batch script. You’ll never know how much time and efforts you are saving by doing this unless you do this once or twice.
After all, laziness is a blessing to motivate you for an innovative idea!!!
Do comment below what other things you have simplified after getting motivation from your laziness 🙂
In my previous post, we’ve seen how to write UI test cases for AngularJS with Jasmine library. I have seen many developers learn this art of improving the quality of UI code by writing test cases, but still very few of them know the tools they are using in this process i.e. grunt, karma (Honestly, I was one of them 🙂 ).
So in this post, we are going to see how do we utilise npm package Karma and task runner Grunt in testing AngularJS code with Jasmine library.
Download it in your local machine as a zip file, extract it and open the folder in your command prompt. Also open the folder in your favourite editor (Sublime text, VSCode, VisualStudio or even in notepad – it doesn’t matter).
You need to have Node.js and npm installed on your local machine to run the scripts.
As you might have noticed, the repository is almost same as per the plunk we have seen in the previous post (point 1, 2 & 3 below).
scripts folder contains AngularJS module definition, controllers and services’ code
vendors folder contains dependent angularjs and angular-mock libraries
tests folder contains our test cases code
package.json
Gruntfile.js
karma.config.js
The other json and js files are the new arrivals, which are actually used when we use Node Package Manager. Let’s look at them one by one.
This file contains bidirectional Unicode text that may be interpreted or compiled differently than what appears below. To review, open the file in an editor that reveals hidden Unicode characters. Learn more about bidirectional Unicode characters
This file contains bidirectional Unicode text that may be interpreted or compiled differently than what appears below. To review, open the file in an editor that reveals hidden Unicode characters. Learn more about bidirectional Unicode characters
This file contains bidirectional Unicode text that may be interpreted or compiled differently than what appears below. To review, open the file in an editor that reveals hidden Unicode characters. Learn more about bidirectional Unicode characters
As you can see, this file contains the list of all npm packages are to be installed for the current project.
grunt is the JavaScript task runner we are going to use, karma & grunt-karma packages are the dependency used to run Jasmine test cases. Other packages are used to execute the test cases against browsers (remember that we are going to run UI test cases!).
Gruntfile.js
This file is used to configure and register the grunt tasks.
In the initConfig call, we are telling grunt to load packages from package.json
We are also informing the grunt which file to use to configure karma, which in our example, is karma.conf.js
In the registerTask call, we have registered karma as the default task. So when we’ll execute just ‘grunt’ command, the test cases will be executed.
karma.conf.js
In this config file, we tell the karma which files are going to be used actually to do the testing.
As you have seen, angularjs, angular-mocks, our source code of the application and testing related files are mentioned in ‘files‘ parameter as an array.
We can also mention which file we want to exclude as ‘exclude‘ parameter.
You can even specify on which ‘port‘ you’d like to run the test cases and also against which browser.
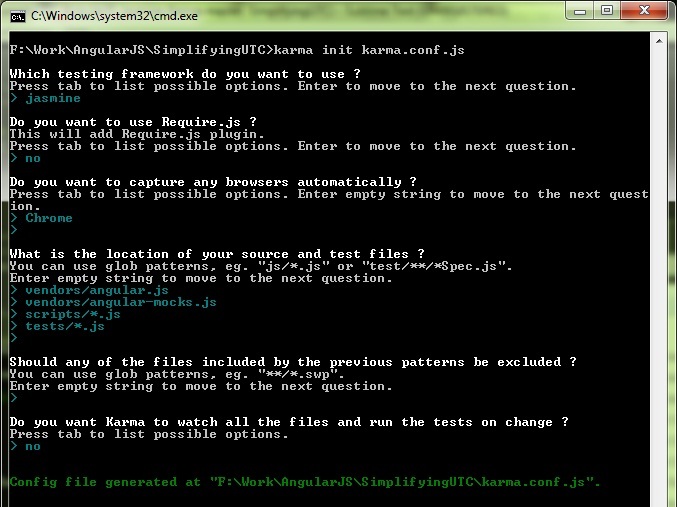
Note: once you are done installing the packages, you can also generate the karma config file yourself by karma init my.conf.js command. Have a look at the screenshot below. The command will guide you to create it. Easy it is, isn’t it!
In our plunk example, we were seeing the result in the browser itself. That’s why we had index.html file including angular, mock and jasmine files; and browsing index.html file we are able to see the result (now you’ll relate how karma config is helping us to do the same here).
Now, follow the instructions mentioned in the repository README file and execute the commands in the command prompt.
npm install (installs the npm packages specified in package.json)
npm install -g grunt-cli (installs grunt cli; -g for globally)
npm install -g karma-cli (installs karma cli; -g for globally)
The above commands install…
the packages mentioned in package.json file
grunt-cli and karma-cli packages (to use the command grunt directly from the command prompt)
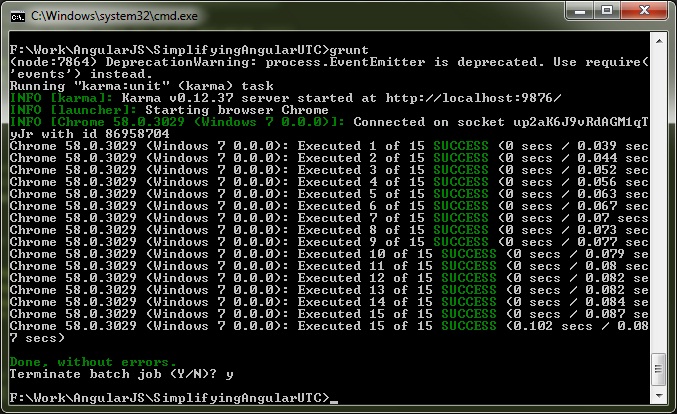
Once done, execute command ‘grunt‘. You’ll see the result in the command prompt as below. You might need to terminate the process with ctrl+c after they are executed.
As you can see that all the fifteen test cases are executed.
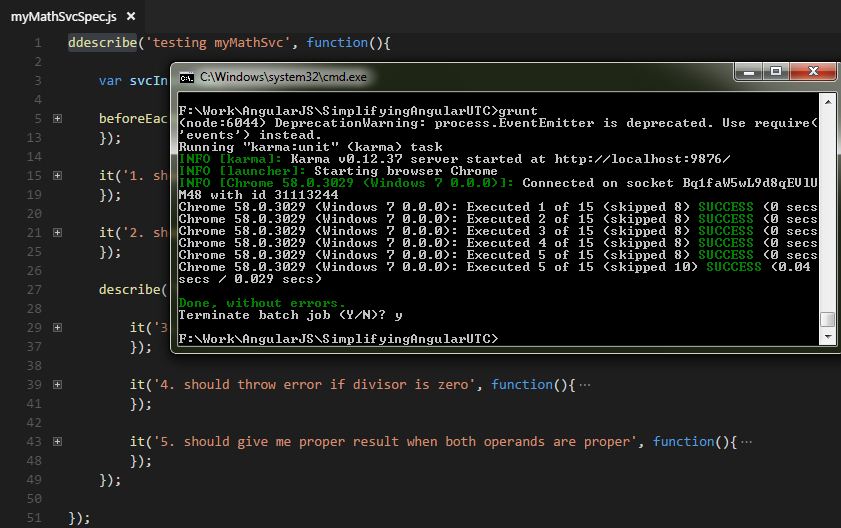
Now, if you want to execute test cases for just a single file, (for example, if you want to do it just for myMathSvcSpec.js file) go to the spec file, add ‘d‘ in front of the ‘describe‘ as per below, save it, run grunt command and you can see that only those test cases are executed which are there in that spec file. The rest are skipped.
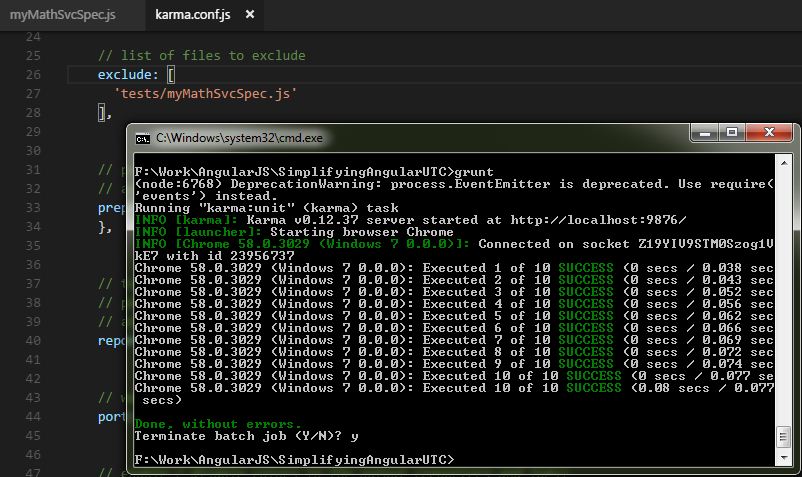
If you want to exclude some files while executing the test cases, you can mention in the karma.conf.js file. For example, if you don’t want test cases of myMathSvcSpec.js to be executed along with the others, you can mention it is karma config file as ‘exclude’ property. Have a look at the screenshot below. As you can see, five test cases of myMathSvcSpec are not executed.
Hope you had a good learning for the topic reading this post.
How do you like it? Any suggestion, question, or anything you would to say about this.
As a developer, I was running away from writing unit tests of UI. However, it is important to develop practice to write the UI unit tests. There are many reasons for that and we are not going to go in that direction, so let’s come to the point.
In this blog, we are going to learn how to write unit test cases for AngularJS controllers with the help of Jasmine library.
Prerequisites:
AngularJS
Some details regarding why we write unit test cases would help
The example I have used uses Angular 1.2.11 and Jasmine 1.3.1. With minor changes, this should also work for the latest version of AngularJS, so you can just focus on the concepts.
Other points to consider:
For Jasmine 2.x, there are few changes in some methods.
For example, for Jasmine 1.3, you would write spyOn(mockObj, ‘method’).andReturn(someReturnVal)
The same thing for Jasmine 2.x, you would write as spyOn(mockObj, ‘method’).and.return(someReturnVal)
Also, there are some changes/enhancement in 2.x, but as of now, we will just focus on the basics.
You all might be aware that Angular 2 (or 4+) is going to use TypeScript; if you are going to write unit test cases for Angular 2 (4+) using Jasmine, there will be just change in the syntax of the test case. The concept would just remain the same. For example (given in https://docs.angularjs.org),
describe('sorting the list of users', function() {
  it('sorts in descending order by default', function() {
  var users = ['jack', 'igor', 'jeff'];
  var sorted = sortUsers(users);
  expect(sorted).toEqual(['jeff', 'jack', 'igor']);
 });
});
The same thing you would write in TypeScript as per below.
describe('sorting the list of users', () => {
  it('sorts in descending order by default', () => {
    var users = ['jack', 'igor', 'jeff'];
    var sorted = sortUsers(users);
    expect(sorted).toEqual(['jeff', 'jack', 'igor']);
  });
});
In short, the concepts you are going to learn in this blog are also going to be applicable for the latest version of Angular as well as Jasmine.
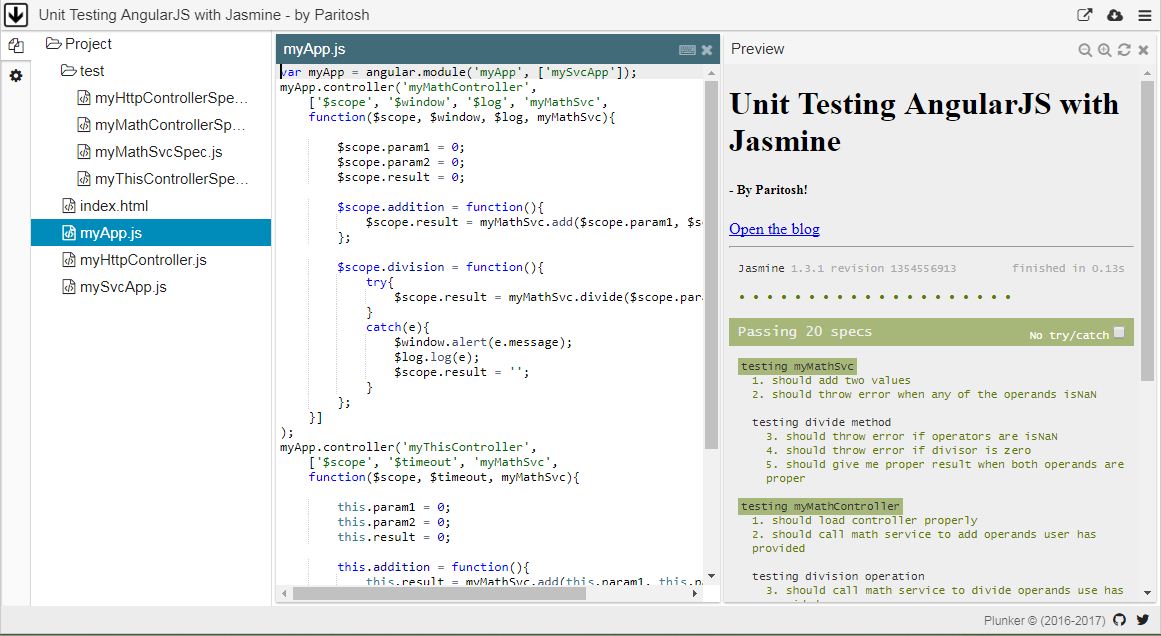
I have created a plunk, which we are going to use as a reference.
Now let’s start understanding how to write unit test cases. Keep your eyes on myMathControllerSpec.js.
If you observe at bird’s eye view, you can identify that the UTC file consist of…..
one describesection/function call at root level
beforeEachsection(s)/call(s)
there is an inject section/call within beforeEach where we get/create the instances of the dependencies
itsection/call where we write and execute individual test cases
Based on the complexity, we may also have (describe)* (0 or multiple describe) section and within that describe, we have (it)+ (one or multiple it) section.
You will also observe that we are…
Initially loading the current and dependant external module
Load/create external dependencies to instantiate the controller
Inject the dependencies and create controller instance
Prepare the data and set spies (check in the test case #2)
Call the function and test the expected result
If we are going to test myApp, first of all we need to load the module in the memory. This is needed when we get the controller instance to test. We may also need to load mySvcApp(in the definition of myApp, verify that mySvcAppis injected as dependency).You may directly inject those dependencies which you get using $injector or you may write mock objects. Verify that we are just giving mock objects of window, log and myMathSvc.
It’s better to provide examples than explaining the same in thousands of words!
So here I am going to provide you the quick references and examples for what kind of unit test cases you can write with Jasmine. All the references belong to the plunk I have created.
Now check myMathController.js and its Spec file – specially test case #2. Below things you will see and learn there.
How to set ‘spyOn’ for a service method and returning a fake result
How to expect the service method to get called
How to expect the service method to get called with specific arguments
How to expect the result as a controller $scope property
How to check if the method is called single or multiple times
How to get the details about just the most recent call of a service
How to reset the spy set on a method (setting isSpy = false)
How to expect and test a function throwing exception/error.
You’ll simply set spyOn a method and throw error in this way
How to test the controller if we are not using $scope level properties (using thisinside controller)
In this type of controller, we use this keyword extensively. You’ll find the example in myThisControllerSpec.js. Have a look at the controller before moving ahead!
How to test $watch callback on a controller property.
Many times we keep $watch on a controller property and do some operations when it changes. Example is explained in myHttpController and testing for the same is provided in related Spec file – test case #4.
How to test $viewContentLoaded callback function
In some cases, we want to call data load operation or any other thing once we are sure that the view is loaded into the DOM. As you know, $viewContentLoaded event is called when this happens. Example of it is given in myHttpController($scope.getData()) and testing for the same is provided in related Spec file – test case #3.
Here we need to load the controller in HTML markup template and compile it against the scope. i.e.
var viewTemplate = 'divStart ng-controller="myHttpController" divEnd';
//consider the appropriate tags in the above statement
$compile(viewTemplate)(scope);scope.$digest();
How to test an async service call – or – a service call returning promise.
This is very well explained in test case #2 of myHttpController. Have a look at how getServerData is called within the controller first of all.
Don’t miss to learn from the comment I have provided over there – then/finally part!!
Apart from all these, we also have test cases for custom directives, scenarios where jQuery code is used (ideally this should be avoided while working with AngularJS, but we have also got it covered!), i.e. jQuery methods like find, animate, index, etc.
I will be covering them next time. Till then, happy learning!
If you think something more should also be added to this blog, any improvement points, or anything you like about this, do comment. Your feedback is welcomed!


 Credits for the details go to the amazing creators of the tool themselves!! – I am just a person sharing the lights of this awesome utilities.
 After all, laziness is a blessing to motivate you for an innovative idea!!!